
Heres Some Camping Tips & Tricks at Your Fingertips
Our Kiefer Campground Blog is the information you need to make your next camping trip even more enjoyable. From RV and camping tips and tricks, to amazing campfire recipes, to advice on planning your next trip... the information below is here to help you. And please, feel free to comment and share your experiences, knowledge and favorite recipes. At Kiefer Campground, we are a family and all here to help each other enjoy the great outdoors to the fullest!
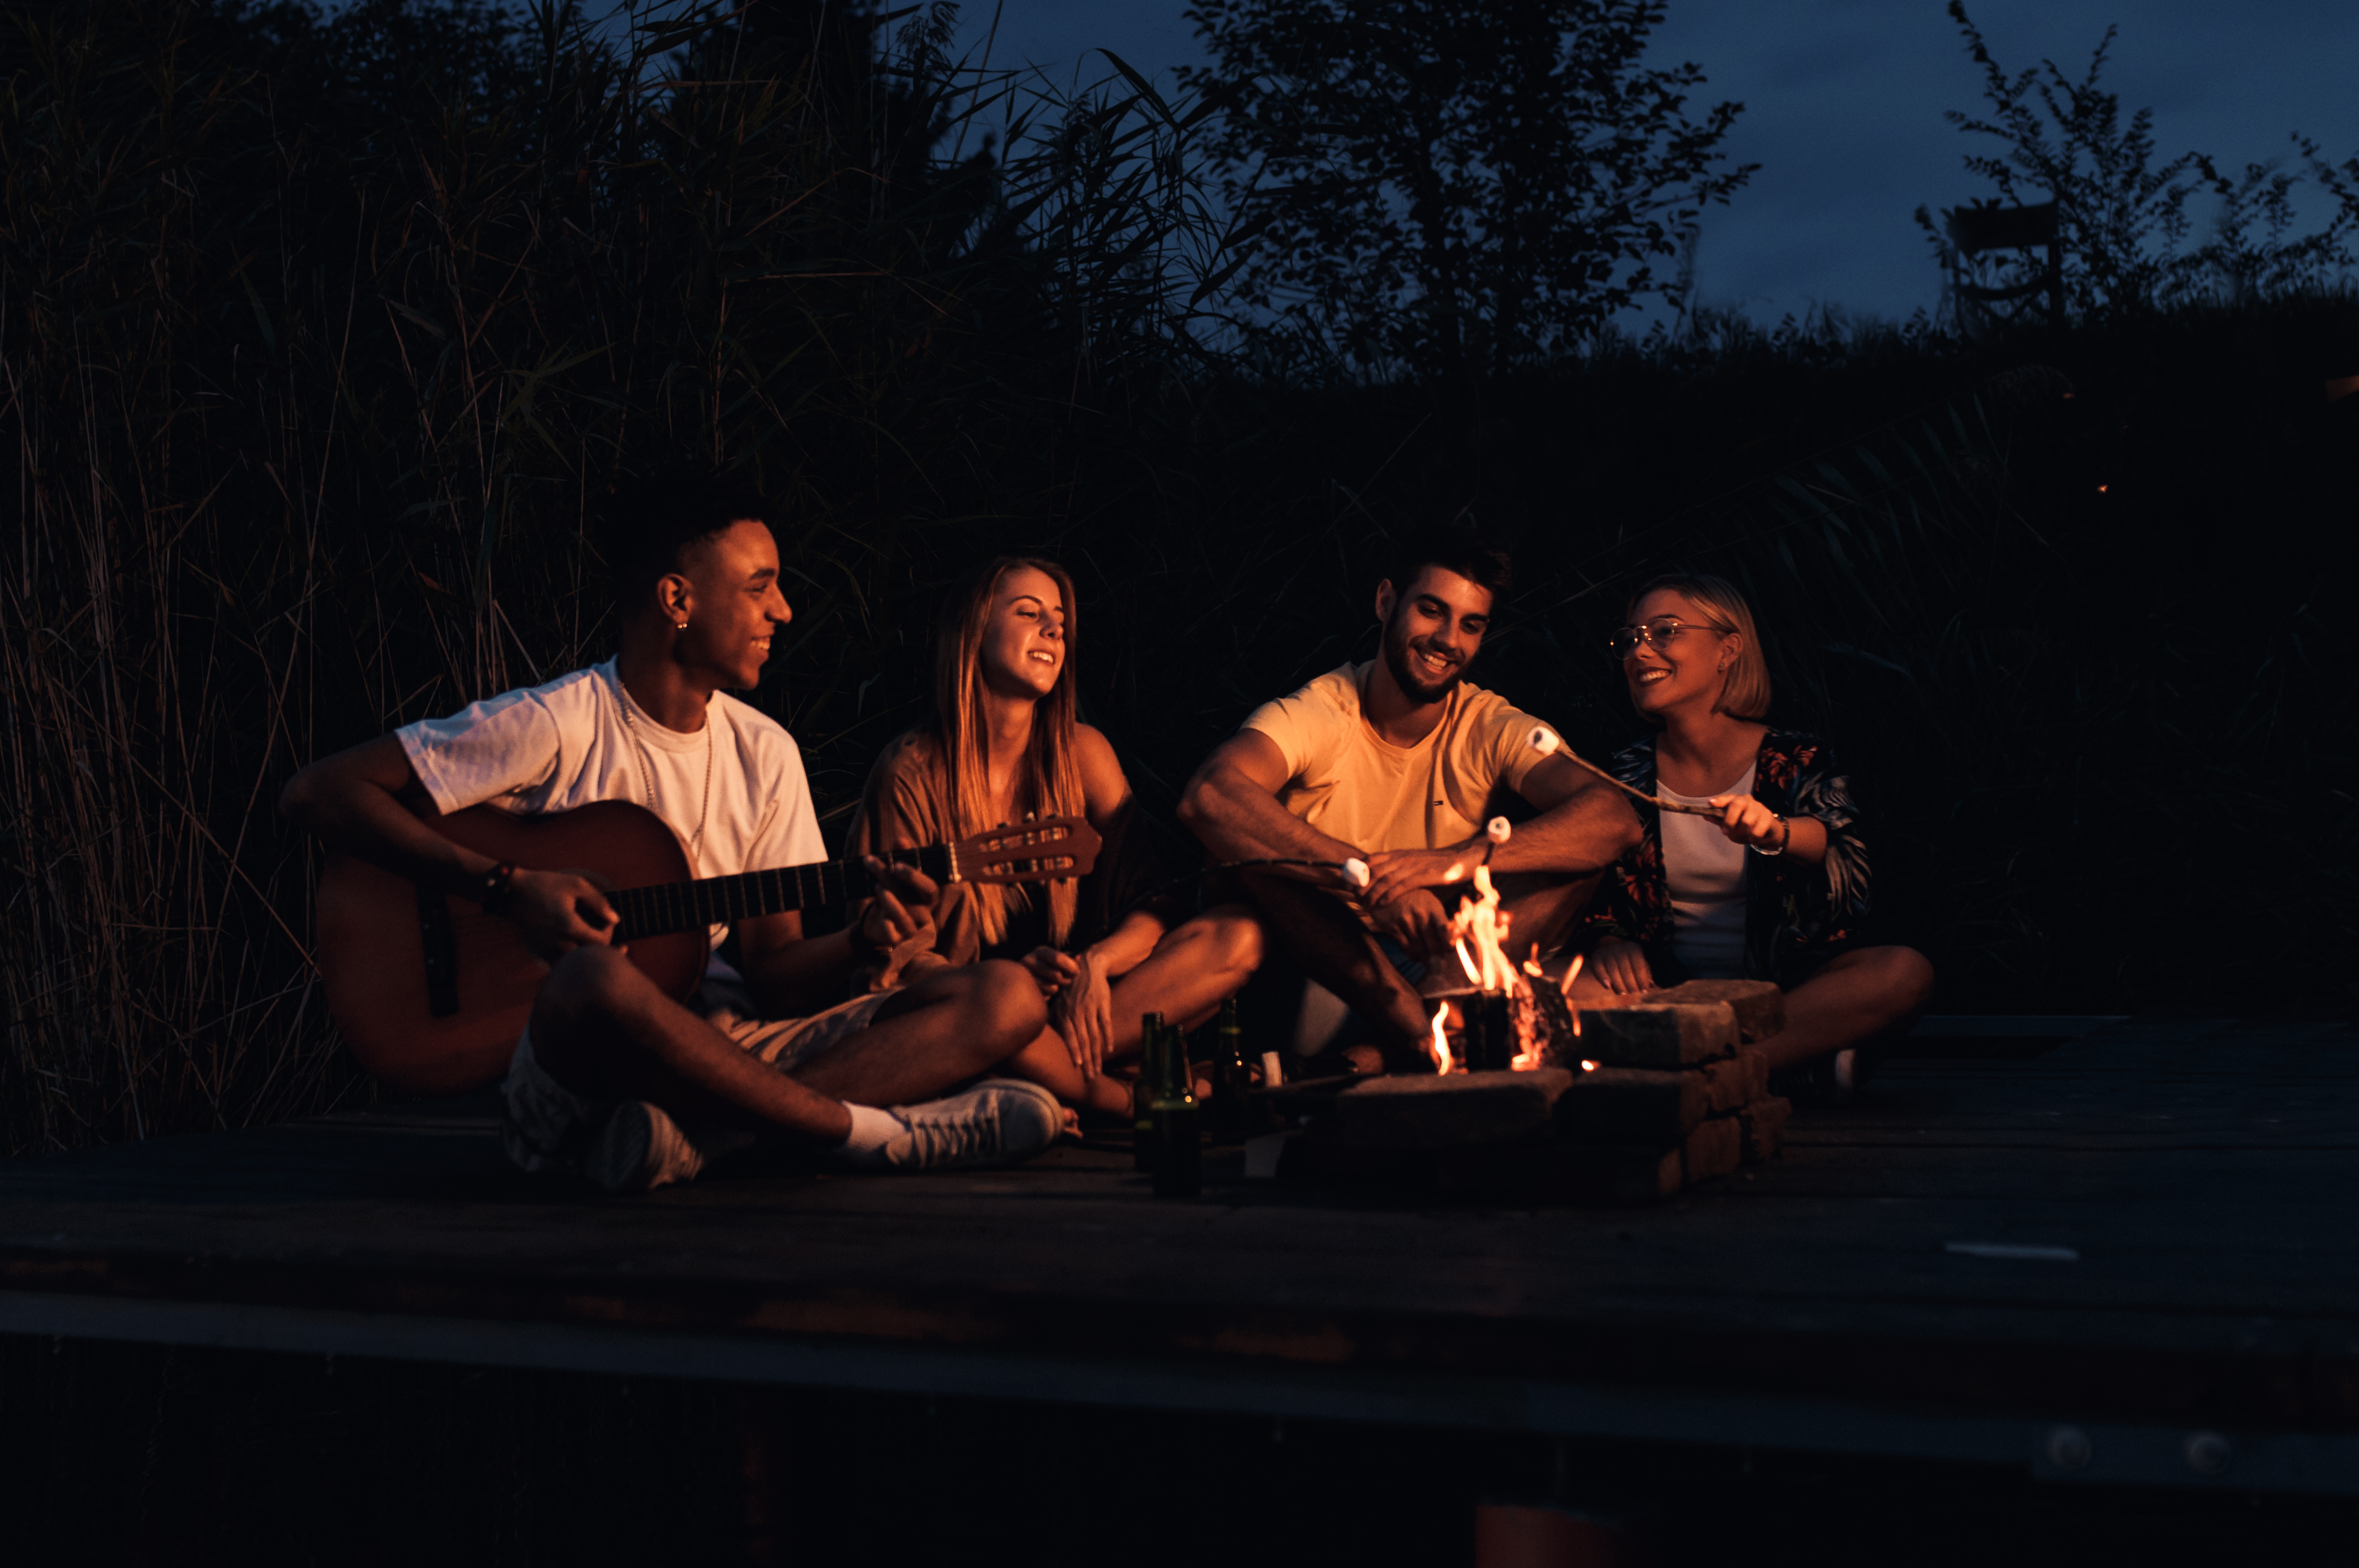
Campfire Games
Campfire games are a great way to enhance the outdoor experience, bringing people together for fun, bonding, and laughter. Here are some popular campfire games suitable for different age groups:
Kids
- Telephone
- Players sit in a circle, and one person whispers a message to the next. The message is passed around the circle, and the last person says it out loud, often with hilarious results due to miscommunication.
- 20 Questions
- One person thinks of an object, and the others take turns asking yes-or-no questions to guess what it is. They have a maximum of 20 questions to figure it out.
- Shadow Puppets
- Using the light from the campfire or a flashlight, create shadows on a surface. Kids can use their hands to form different animals or objects and tell stories with their shadow creations.
- Campfire Storytime
- Encourage kids to tell their own stories. These can be spooky, funny, or adventurous. It’s a great way to spark creativity and imagination.
Teens
- Truth or Dare
- A classic game where players take turns choosing between answering a question truthfully or performing a dare. It’s a great way to get to know each other better and have some laughs.
- Mafia
- A role-playing game where players are assigned different roles (mafia, detective, townspeople) and must figure out who the mafia members are through discussion and voting.
- Flashlight Tag
- An after-dark game where one player is “it” and must tag others with the beam of a flashlight. It’s a thrilling game that combines hide-and-seek with the cover of darkness.
- Charades
- Players act out a word or phrase without speaking while others try to guess what it is. This game can lead to a lot of laughter and creative thinking.
Adults
- Two Truths and a Lie
- Each person takes turns saying three statements about themselves – two true and one false. Others must guess which statement is the lie.
- Never Have I Ever
- Players take turns saying something they have never done. Anyone who has done that thing must put down a finger or take a sip of their drink. The first to lose all their fingers or finish their drink loses.
- Campfire Stories
- Adults can take turns telling personal anecdotes, scary stories, or funny tales from their past. This can lead to great conversations and bonding.
- Name That Tune
- Someone hums or whistles a tune, and the others try to guess the song. This can be especially fun with popular songs that everyone knows.
Mixed Ages
- S’mores Bingo
- Create bingo cards with different s’mores ingredients and combinations. As people make and eat different types of s’mores, they mark off their cards. The first to get bingo wins a prize.
- Sing-Alongs
- Gather everyone for a sing-along session. Classic campfire songs, popular hits, or even made-up songs can bring joy and unity to the group.
- Scavenger Hunt
- Organize a scavenger hunt that can be played around the campsite. Provide a list of items to find or tasks to complete. This can be a fun way to explore the surroundings.
- Story Chain
- One person starts a story with a single sentence, and each subsequent person adds another sentence, continuing the tale. This can lead to unexpected and humorous storylines.
These games can make campfire gatherings memorable and fun, encouraging interaction and creating lasting memories
Gather around the campfire and try out these games on your next camping at one of our Kiefer campgrounds.
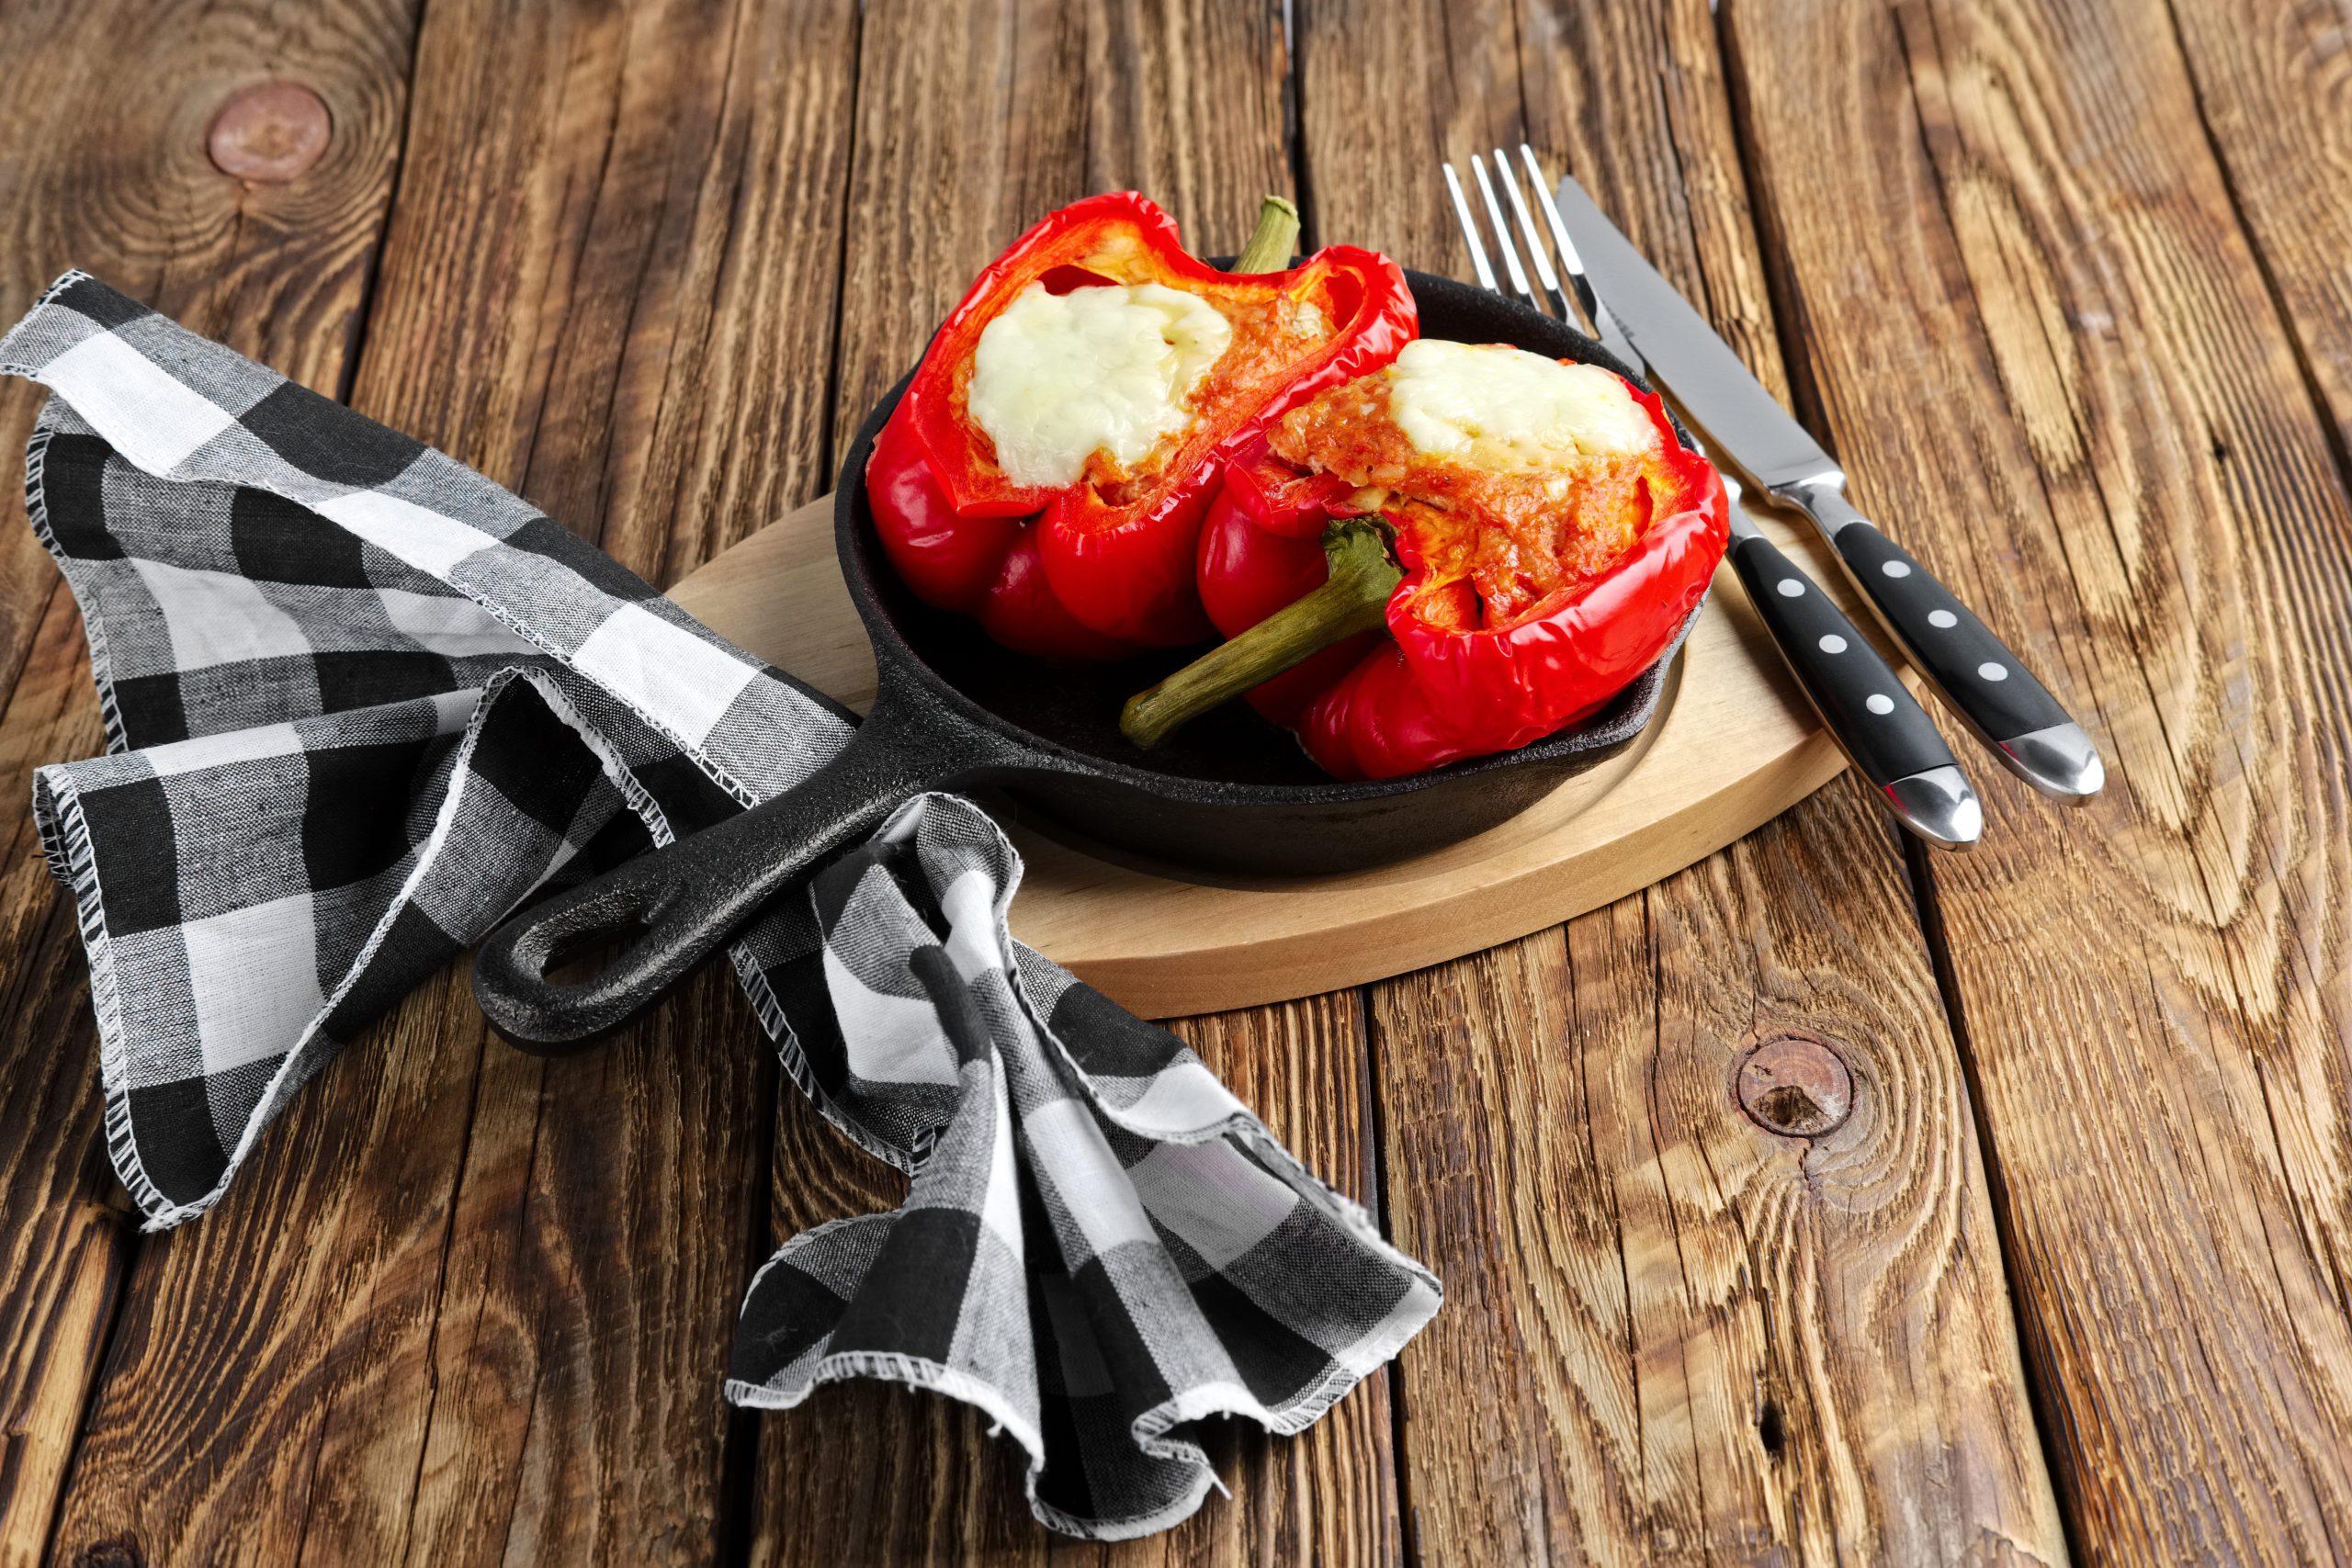
Campfire Stuffed Peppers
Campfire stuffed peppers sound like a delicious and adventurous twist on a classic dish! Here’s a simple recipe you could try:
Ingredients:
- 4 large bell peppers (any color)
- 1 pound ground beef or turkey
- 1 cup cooked rice
- 1 cup canned diced tomatoes
- 1 cup shredded cheese (cheddar or your favorite)
- 1 small onion, diced
- 2 cloves garlic, minced
- Salt and pepper to taste
- Optional: chopped fresh herbs like parsley or cilantro for garnish
Instructions:
- Prepare the Peppers: Cut the tops off the peppers and remove the seeds and membranes. You want the peppers to stand upright, so you may need to slice a small amount off the bottom if they’re uneven. Set aside.
- Prepare the Filling: In a skillet over medium heat, cook the ground beef (or turkey) until it’s browned. Add the diced onion and minced garlic, cooking until softened and fragrant.
- Combine Ingredients: In a large bowl, mix together the cooked beef mixture, cooked rice, diced tomatoes, and half of the shredded cheese. Season with salt and pepper to taste.
- Stuff the Peppers: Fill each pepper with the mixture, packing it down gently. Top each pepper with the remaining shredded cheese.
- Cooking over Campfire: If you’re cooking over a campfire, you can wrap each stuffed pepper individually in aluminum foil. Place the wrapped peppers on a grill grate over the fire and cook for about 20-25 minutes, or until the peppers are tender and the filling is heated through.
- Serve: Carefully unwrap the foil from each pepper and transfer them to plates. Garnish with chopped fresh herbs if desired. Enjoy your campfire stuffed peppers!
This recipe is versatile, so feel free to customize it with your favorite ingredients or spices to suit your taste. And of course, cooking them over a campfire adds that extra element of outdoor adventure!
Try this amazing recipe for Campfire Stuffed Peppers on your next camping trip to Kiefer Campgrounds.
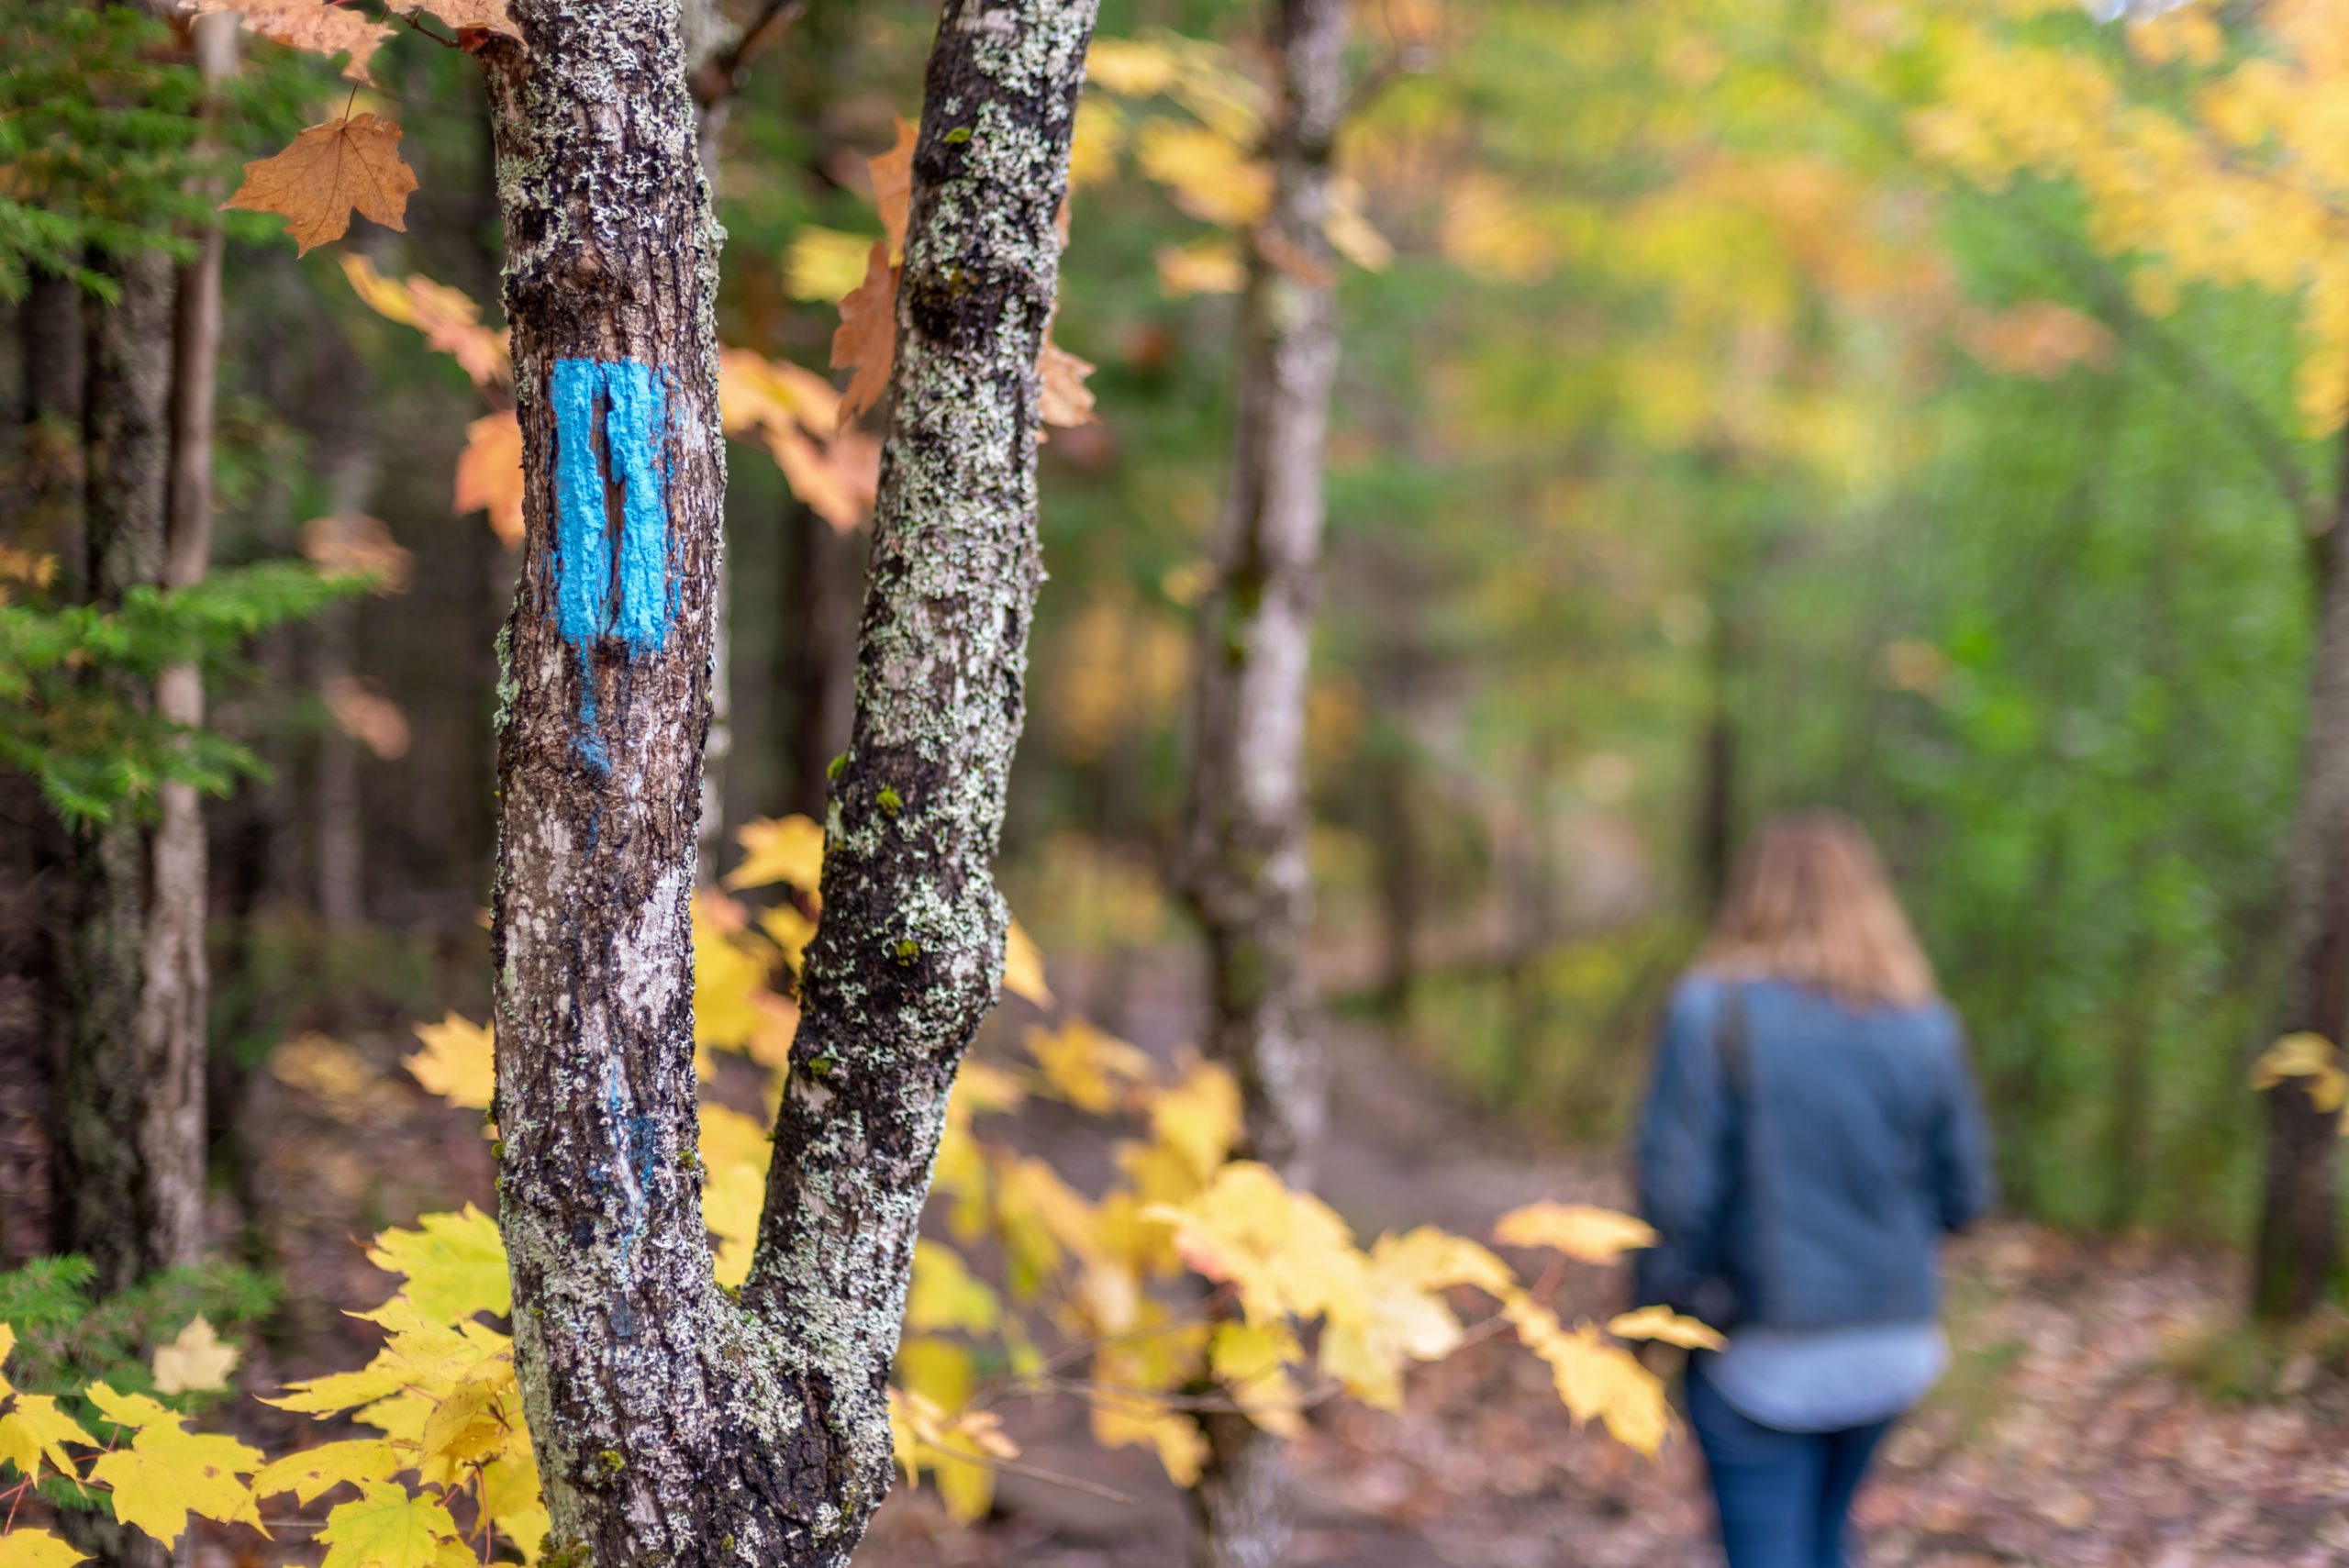
How To Mark A Trail When Hiking
Marking a trail is essential for hikers, adventurers, and outdoor enthusiasts to navigate safely and enjoyably. Here’s a step-by-step guide on how to mark a trail:
- Choose Your Markers: Decide on the type of markers you’ll use. Common options include colored ribbons, trail blazes (painted marks on trees or rocks), cairns (stacked rocks), or signs.
- Understand Regulations: Before marking a trail, make sure you understand any regulations or permissions required. Some areas may have restrictions on trail marking to preserve the natural environment.
- Plan Your Route: Walk the trail to familiarize yourself with it. Note any key landmarks, intersections, or areas where markers are needed for guidance.
- Select Strategic Locations: Determine where to place markers. They should be visible from the previous marker and lead the way to the next one, especially at trail junctions or areas where the trail might be unclear.
- Use Consistent Markings: Choose a consistent pattern or color scheme for your markers to avoid confusion. For example, use orange ribbons or blue blazes consistently throughout the trail.
- Placement: Place markers at eye level, ensuring they’re easily visible to hikers. Avoid placing markers too high or too low, as they may be overlooked or obscured.
- Consider Environmental Impact: Be mindful of the environment when placing markers. Avoid damaging trees or vegetation, and use biodegradable markers whenever possible.
- Provide Clear Direction: Markers should clearly indicate the direction of the trail. Use arrows or directional symbols if necessary, especially at intersections or forks in the trail.
- Maintain Markers: Regularly inspect and maintain the trail markers to ensure they remain visible and intact. Replace any damaged or missing markers promptly.
- Document and Share: Document the trail marking process with photos or maps, and share this information with local hiking groups or authorities. This can help others navigate the trail safely.
- Respect Nature: Remember to leave no trace. When marking a trail, strive to minimize your impact on the natural environment and leave it as you found it.
By following these steps, you can effectively mark a trail to help others navigate and enjoy the outdoor experience safely.
At Kiefer Campgrounds, we ask to be safe and take caution when hiking. It’s always best to know the area beforehand.
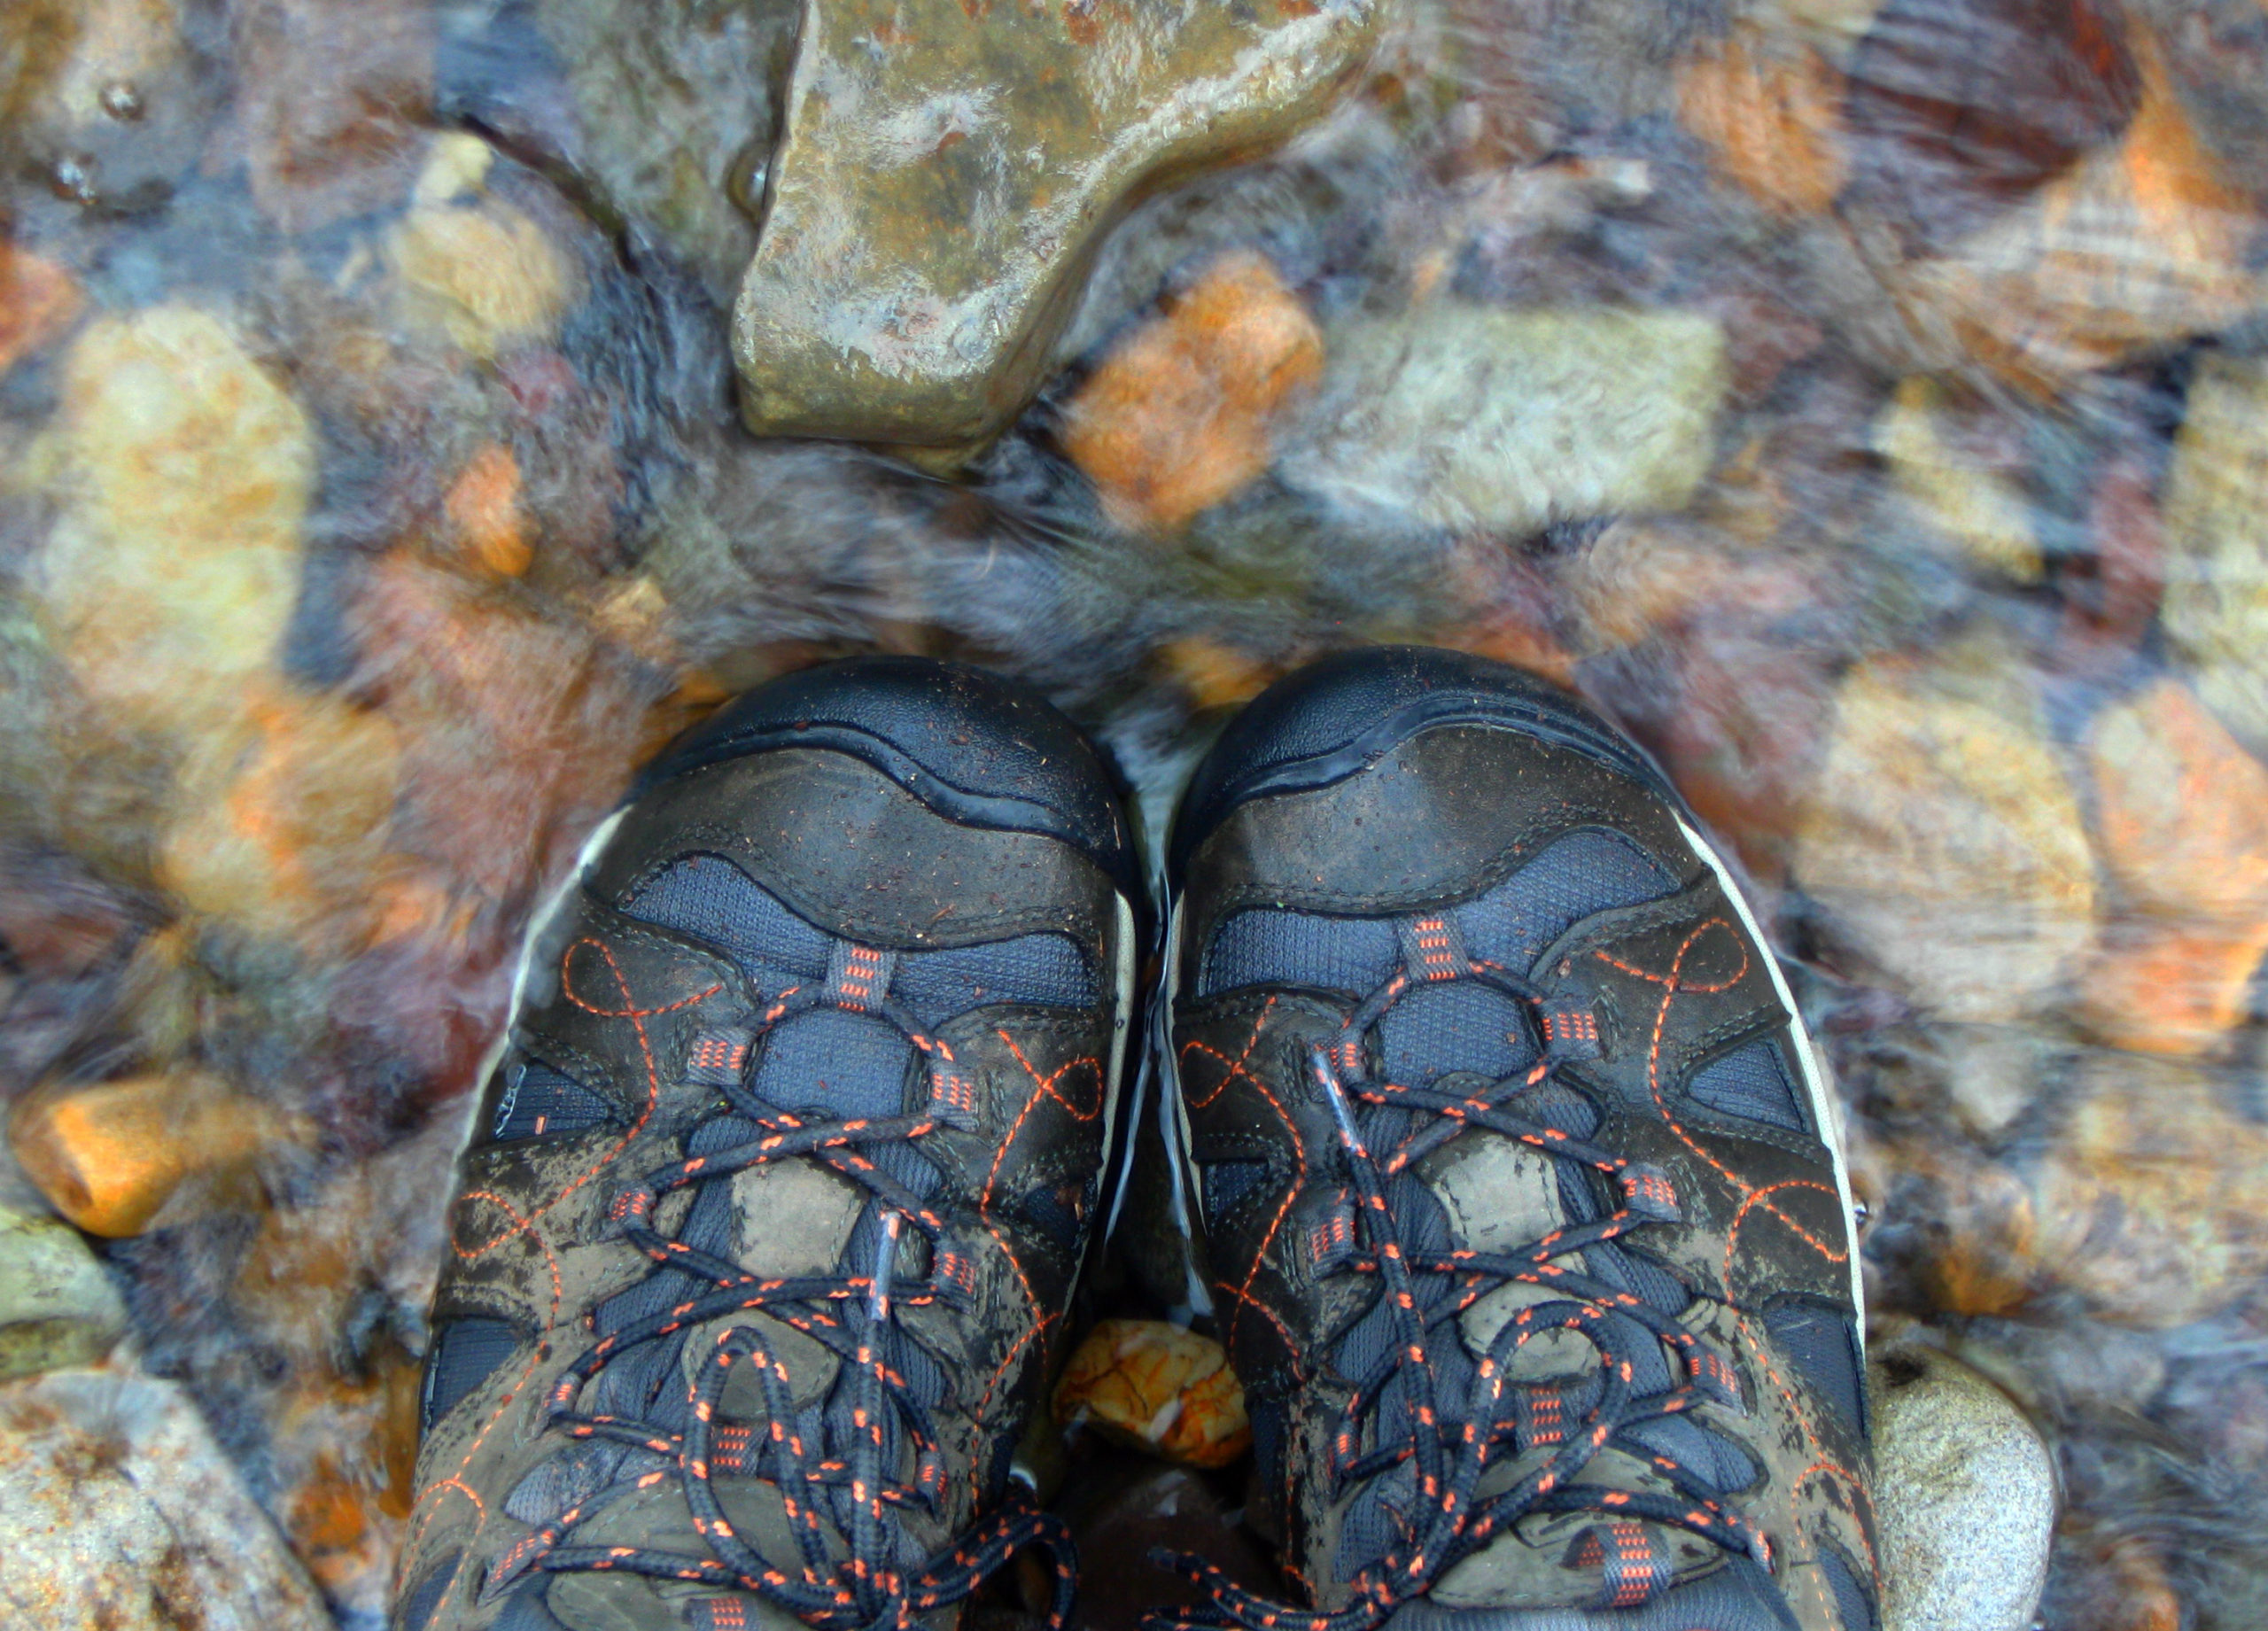
How To Dry Wet Boots With Hot Rocks
Drying wet boots with hot rocks is an old-school method that can be effective if done safely. Here’s a step-by-step guide:
- Select suitable rocks: Look for smooth rocks that are free of cracks and fissures. Avoid porous rocks like sandstone, as they may retain moisture and could potentially explode when heated.
- Clean the rocks: Rinse the rocks thoroughly to remove any dirt or debris. Let them dry completely before using them.
- Heat the rocks: Place the rocks in a fire or heat them over a stove or grill. Make sure to heat them gradually to prevent cracking due to rapid temperature changes. Use tongs or a shovel to handle the rocks to avoid burns.
- Prepare the boots: Remove any excess water from the boots by shaking them or using a towel. Stuff the boots with newspaper or a cloth to help absorb moisture from the inside.
- Place the rocks in the boots: Once the rocks are hot enough, carefully place them inside the boots. Make sure they are not too hot to avoid damaging the boots.
- Allow the rocks to absorb moisture: Leave the rocks inside the boots for about 20-30 minutes, allowing them to absorb the moisture. Check the temperature of the rocks periodically to ensure they are not overheating.
- Remove the rocks: After the allotted time, carefully remove the rocks from the boots using tongs or a shovel. Be cautious as the rocks may still be hot.
- Air dry: Once the rocks are removed, allow the boots to air dry completely in a well-ventilated area. Avoid placing them near direct heat sources like a fireplace or heater, as this can damage the boots.
- Check for dryness: After a few hours, check the boots to ensure they are completely dry before wearing them again.
Remember to exercise caution when handling hot rocks to avoid burns or injury, and always prioritize safety when using any drying method for boots or other gear.
This is a great tip to know when you’re hiking or camping at one of our Kiefer Campgrounds.
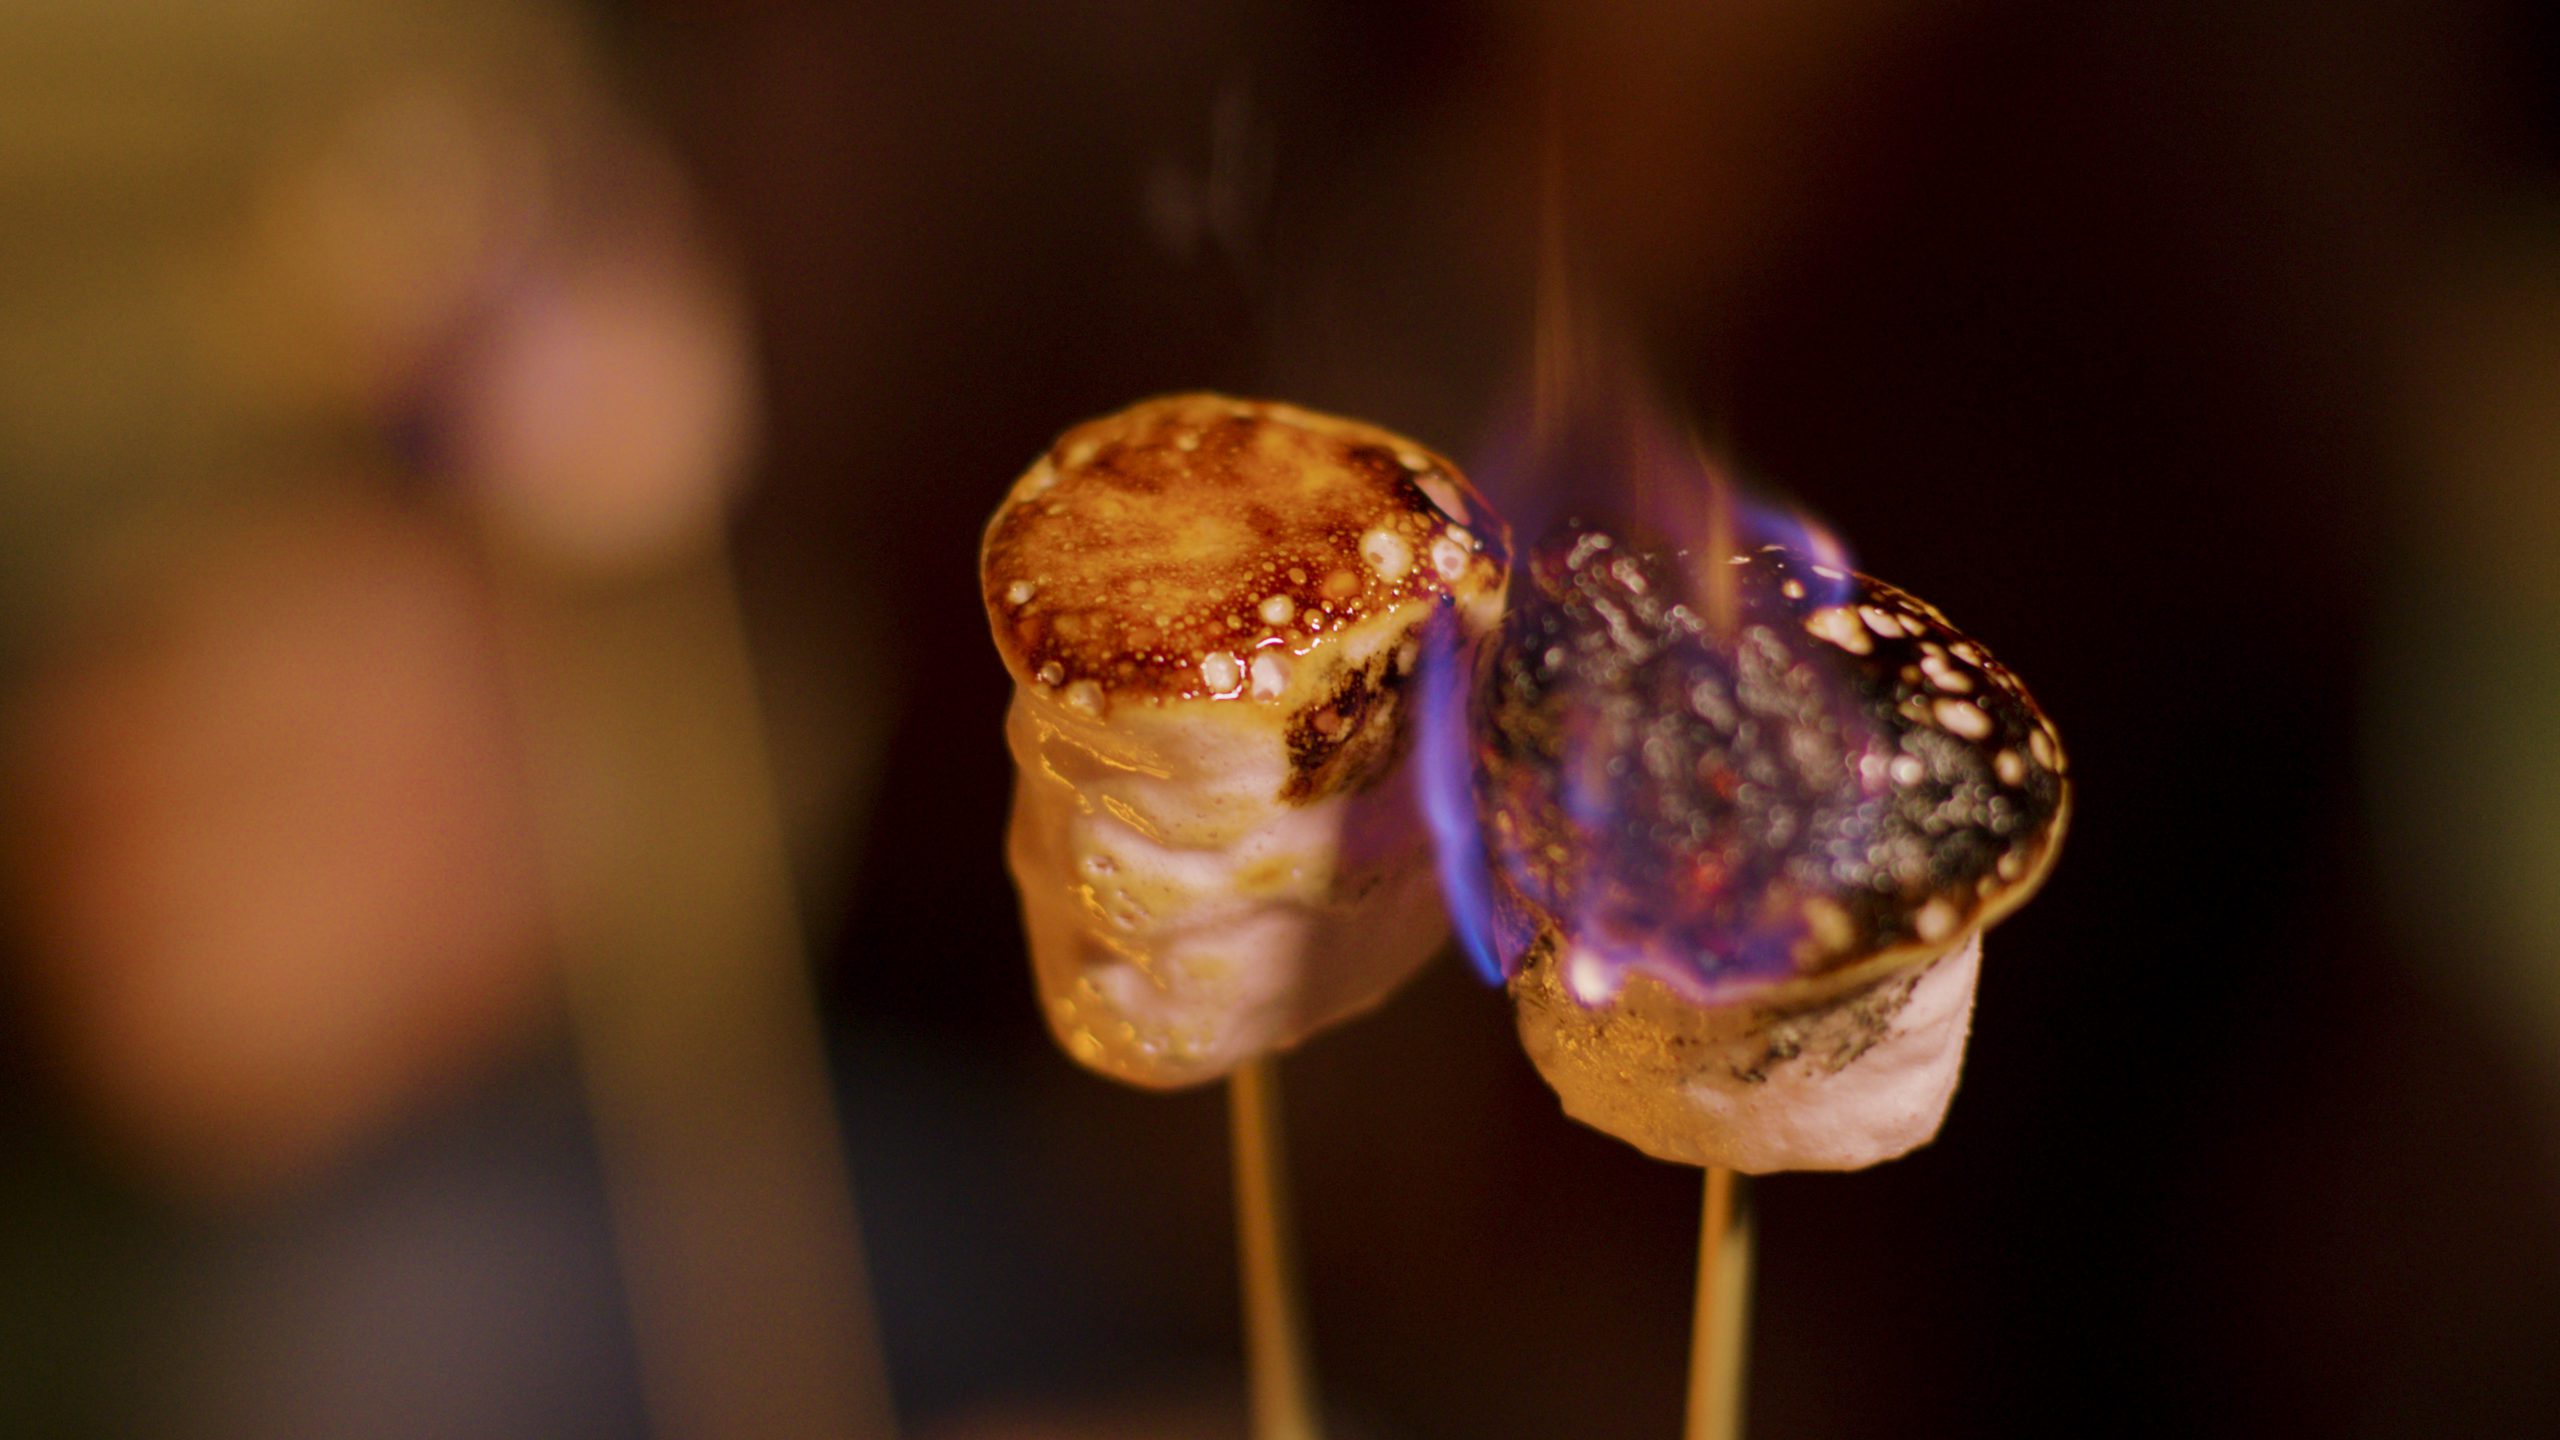
Roasted Marshmallow Kahlua Shots
Roasted Marshmallow Kahlua Shots sound like a delicious and indulgent treat! Here’s a simple recipe you can follow to make them:
Ingredients:
- Marshmallows
- Kahlua (coffee-flavored liqueur)
- Chocolate syrup (optional, for garnish)
- Graham cracker crumbs (optional, for garnish)
Instructions:
- Start by roasting your marshmallows. You can do this over a campfire, using a kitchen torch, or by placing them under the broiler in your oven until they’re golden brown and slightly charred.
- Once your marshmallows are roasted, let them cool slightly.
- While the marshmallows are cooling, prepare shot glasses by drizzling a little chocolate syrup around the inside rim of each glass. You can also dip the rims in graham cracker crumbs for extra flavor and decoration.
- Carefully place a roasted marshmallow into each shot glass.
- Pour Kahlua over the marshmallows until the shot glasses are filled.
- Optionally, you can garnish the top of each shot with a sprinkle of graham cracker crumbs or a drizzle of chocolate syrup for extra flair.
- Serve immediately and enjoy your delicious Roasted Marshmallow Kahlua Shots!
These shots are perfect for a cozy night in or for impressing guests at a gathering. They combine the rich, coffee flavor of Kahlua with the nostalgic taste of roasted marshmallows for a delightful treat that’s sure to be a hit! Remember to enjoy responsibly.
Who said the perfect camping drink doesn’t exist? Try these Roasted Marshmallow Kahlua Shots on your next trip to Kiefer Campgrounds. Drink responsibly!
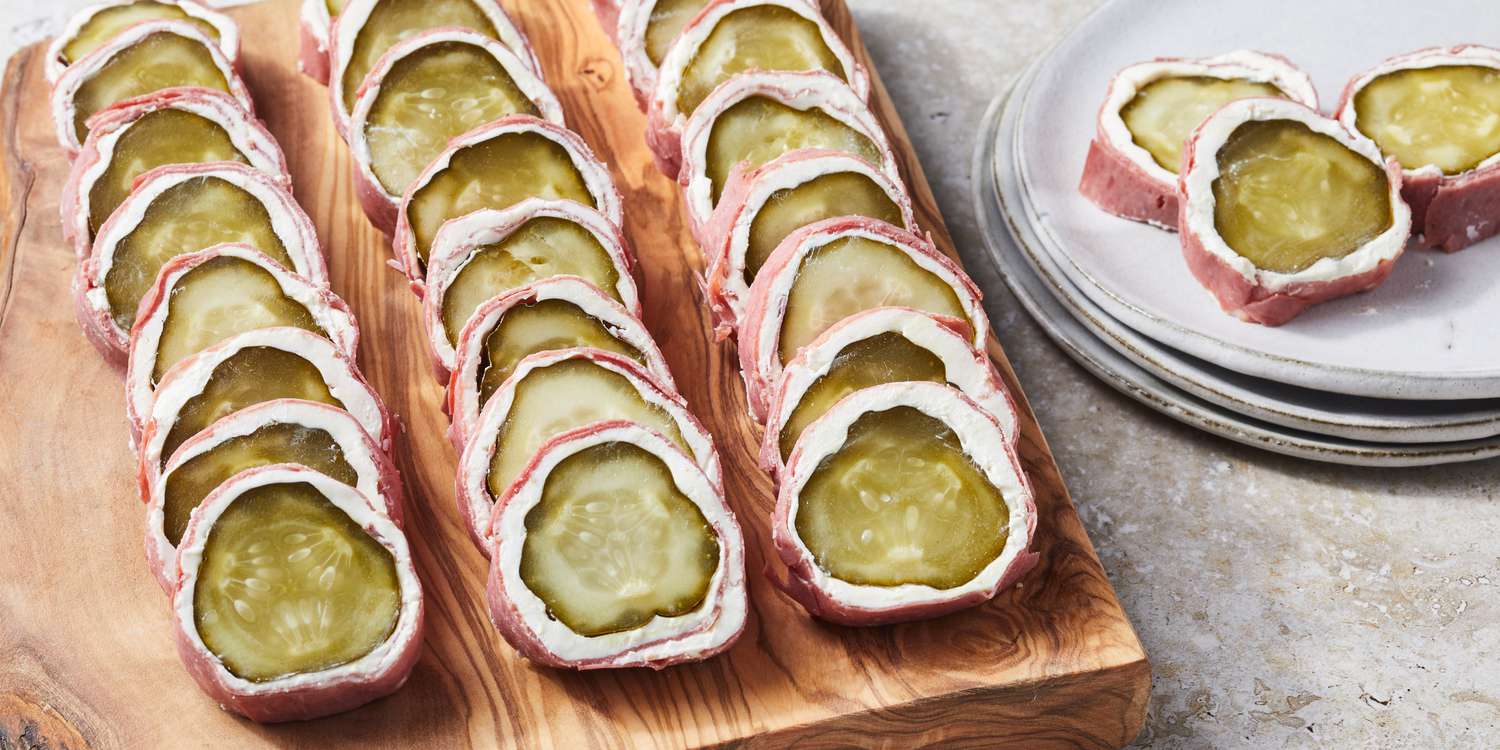
Pickle, Ham, and Cream Cheese Pinwheels
Pickle, Ham, and Cream Cheese Pinwheels are a delicious and easy-to-make appetizer or snack. Here’s a simple recipe to guide you through making them:
Ingredients:
- 1 package (8 ounces) cream cheese, softened
- 1/4 cup chopped dill pickles
- 1/4 cup chopped cooked ham
- 4 large flour tortillas (10 inches)
- Salt and pepper to taste
Instructions:
- In a mixing bowl, combine the softened cream cheese, chopped pickles, and chopped ham. Mix until well combined. Season with salt and pepper to taste.
- Lay out one flour tortilla on a clean work surface. Spread a quarter of the cream cheese mixture evenly over the tortilla, leaving a small border around the edges.
- Roll up the tortilla tightly to form a log. Repeat with the remaining tortillas and cream cheese mixture.
- Place the rolled tortillas in the refrigerator for about 30 minutes to firm up.
- Once chilled, remove the rolled tortillas from the refrigerator and slice them into 1-inch thick pinwheels.
- Arrange the pinwheels on a serving platter and serve immediately, or store them in an airtight container in the refrigerator until ready to serve.
These pickle, ham, and cream cheese pinwheels make a delicious appetizer or snack for any occasion! Enjoy!
A quick and easy recipe to make on your next camping trip to any of our Kiefer Campgrounds.
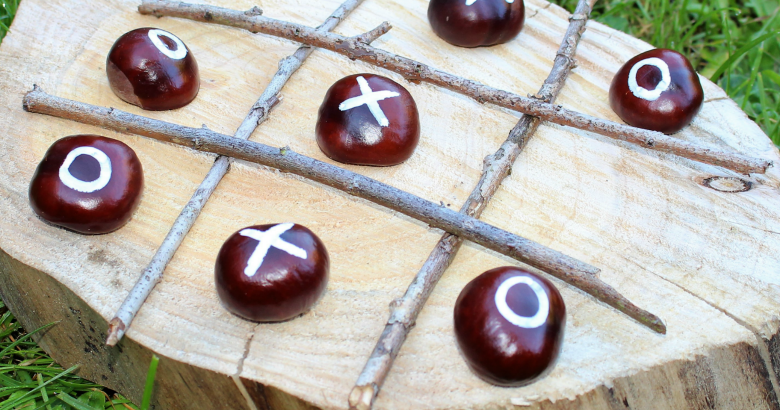
DIY Camping Tic-Tac-Toe
Creating a DIY tic-tac-toe game for camping can be a fun and engaging activity. Here’s a simple guide to making one:
Materials Needed:
- Flat Stones or Wood Slices: You’ll need nine identical flat stones or wood slices. These will serve as the playing pieces.
- Marker or Paint: Use a waterproof marker or paint to draw the X’s and O’s on the stones or wood.
- Canvas Bag or Pouch: To store the game pieces when not in use.
- Sturdy Fabric or Tarp: For the game board.
- Rope or Twine: To create the grid on the game board.
- Stakes or Heavy Objects: To secure the corners of the game board to the ground.
Instructions:
- Prepare the Game Board:
- Lay out your fabric or tarp on a flat surface. Make sure it’s large enough to accommodate a 3×3 grid.
- Use rope or twine to create the grid on the fabric. Tie knots at the intersections to mark the spaces.
- Decorate the Playing Pieces:
- Use your marker or paint to draw X’s and O’s on the flat stones or wood slices. Make sure they’re clearly distinguishable from each other.
- Set Up the Game:
- Place the game board on a flat area of ground at your campsite.
- Use stakes or heavy objects to secure the corners of the game board to the ground so it doesn’t blow away in the wind.
- Play:
- Decide who will be X’s and who will be O’s.
- Players take turns placing their X’s or O’s on the grid, trying to form a row of three horizontally, vertically, or diagonally.
- The first player to get three of their symbols in a row wins the game.
- Store the Pieces:
- When you’re finished playing, gather up the playing pieces and store them in a canvas bag or pouch for safekeeping.
Additional Tips:
- For a more durable game board, you can use a heavy-duty fabric like canvas or vinyl.
- If you’re camping near a beach, you can use sticks to create the grid in the sand instead of using fabric and rope.
- To make the game more challenging, you can increase the size of the grid to 4×4 or 5×5.
- Consider laminating the game board for added durability and weather resistance.
Creating a DIY tic-tac-toe game is a great way to add some entertainment to your camping trip while also fostering friendly competition among campers!
Try DIY Tic-Tac-Toe on your next camping trip to any of our Kiefer Campgrounds!
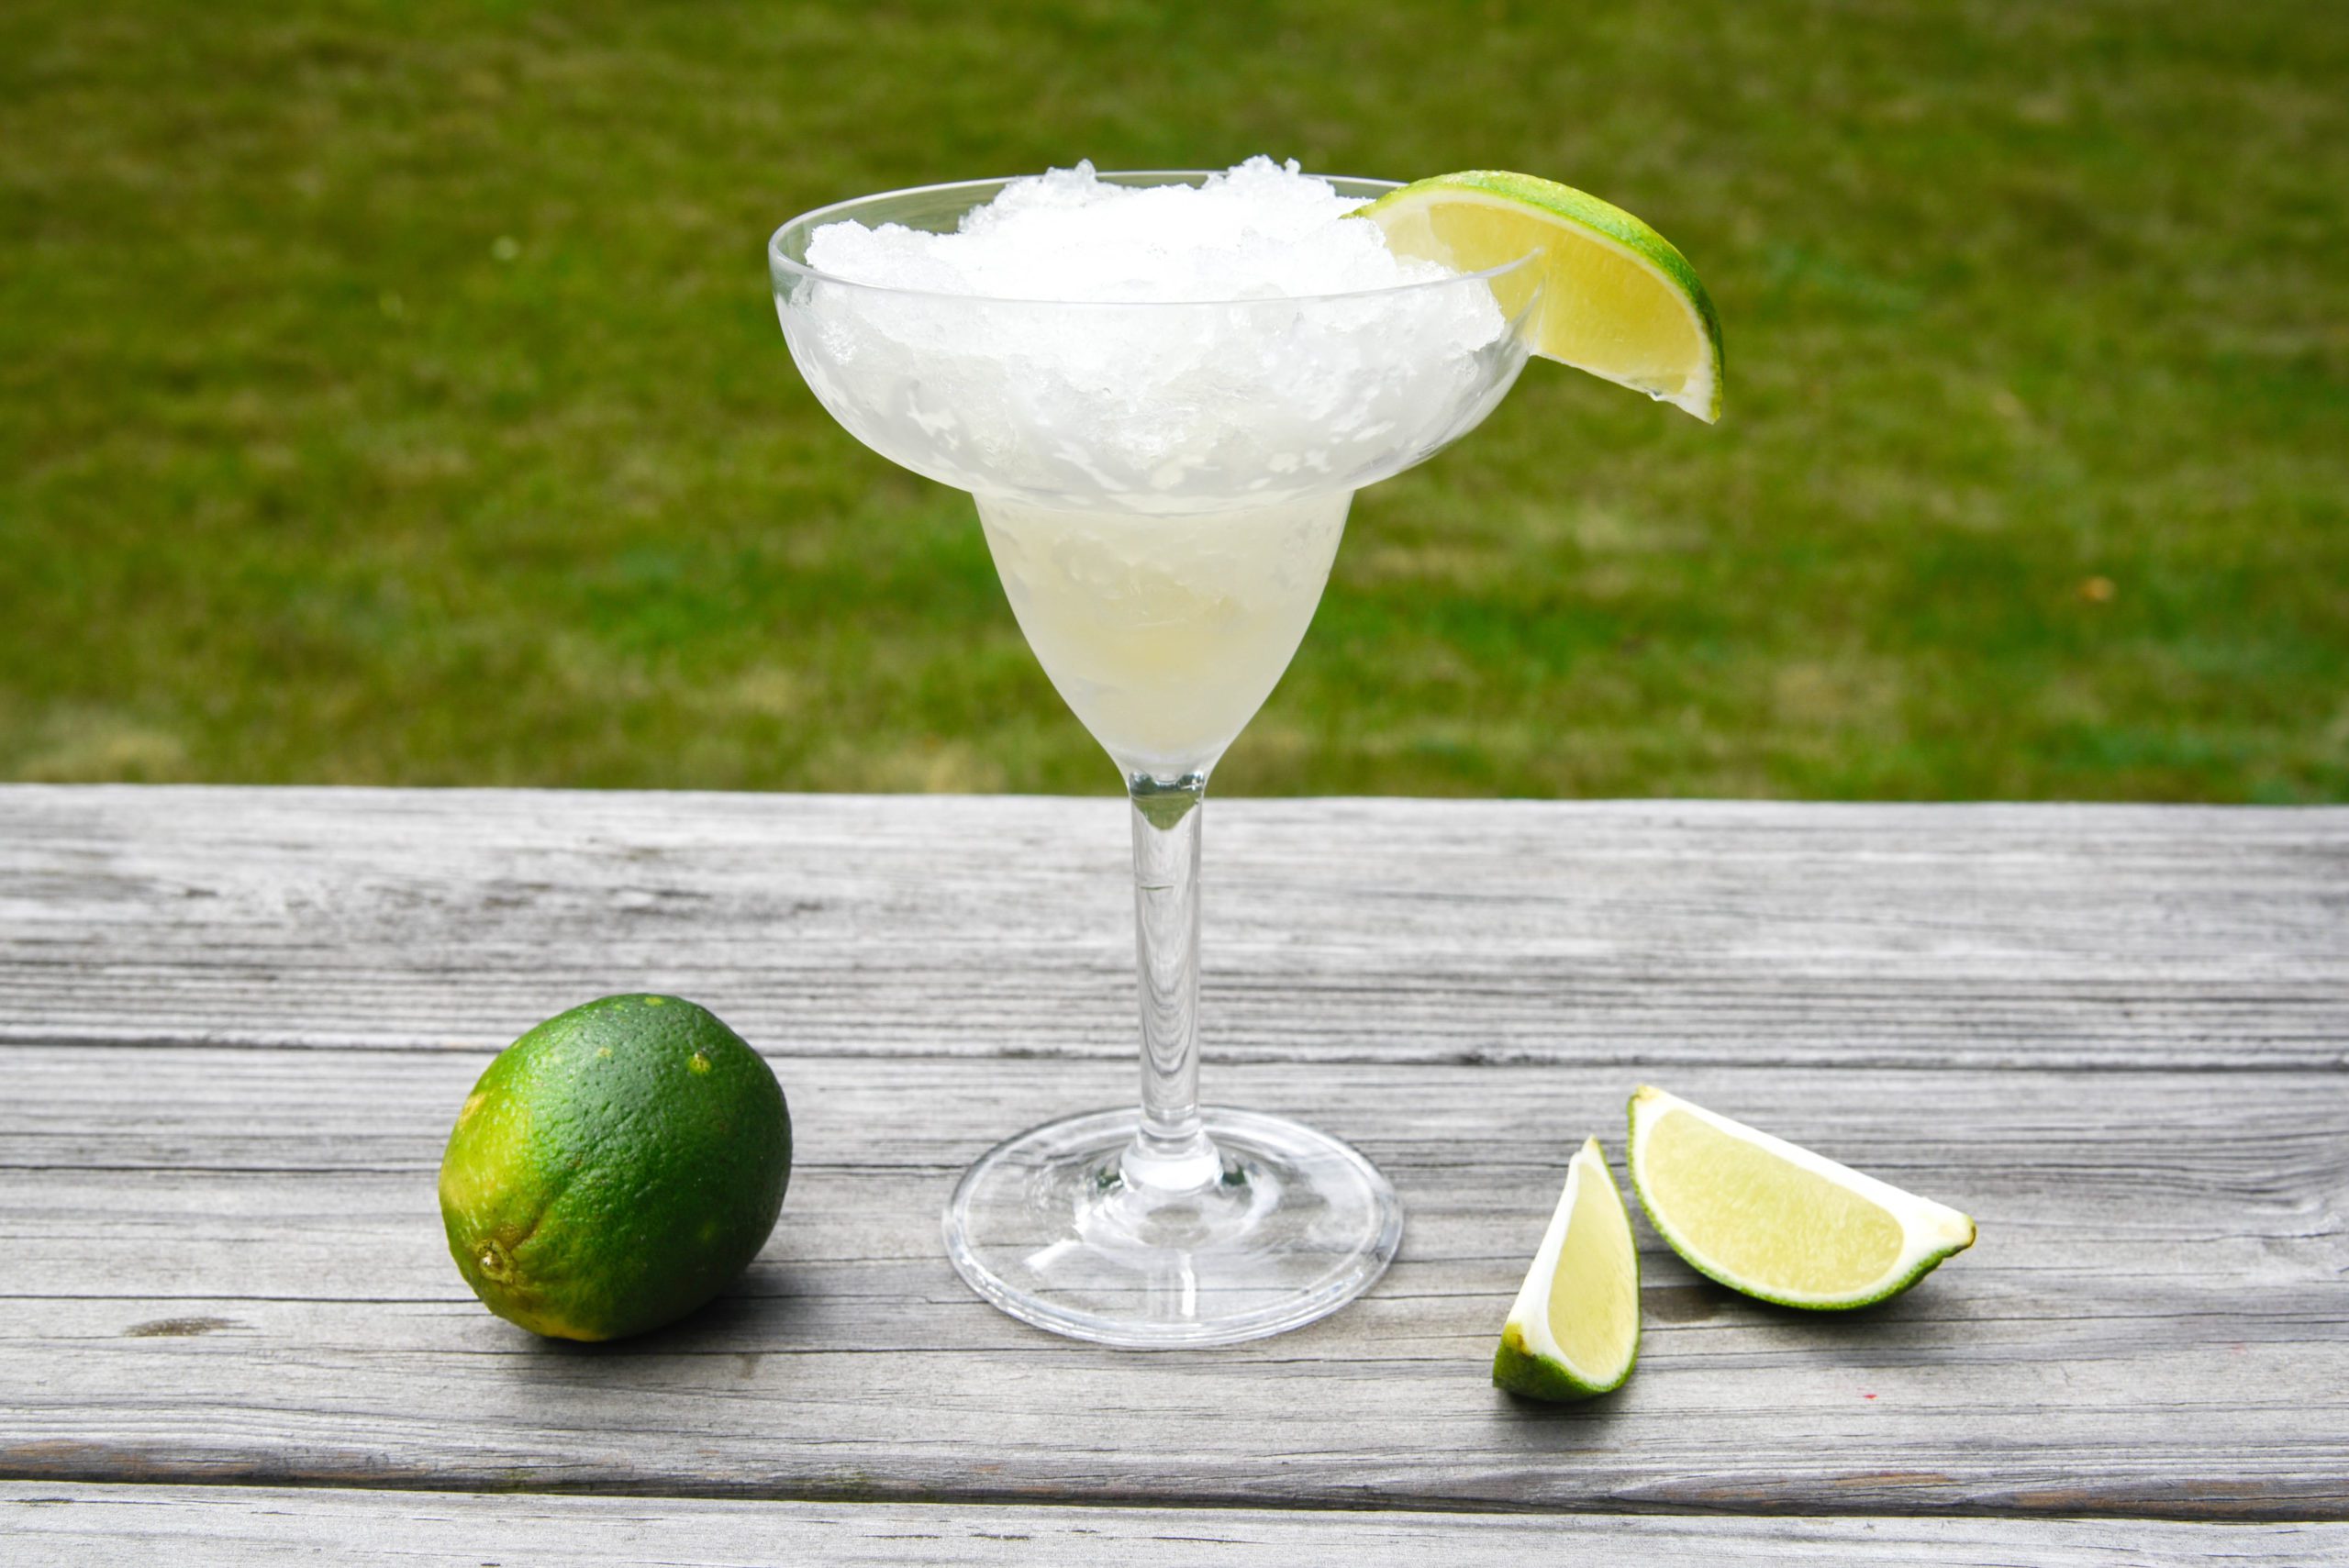
Camping Margaritas
Making margaritas while camping can be a fun and refreshing activity. Here’s a simple recipe for making camping-friendly margaritas:
Ingredients:
- Tequila
- Triple sec or orange liqueur
- Lime juice (fresh if possible)
- Simple syrup (equal parts water and sugar, dissolved together)
- Ice
- Salt (for rimming the glass, optional)
- Limes for garnish
Instructions:
- Prepare Ingredients:
- Measure out the ingredients before you leave for your camping trip to make things easier.
- If you’re making simple syrup, dissolve equal parts sugar and water together before leaving and store it in a small container.
- Rim the Glass (Optional):
- If you like, moisten the rim of your camping cup or glass with a lime wedge.
- Dip the rim into salt, creating a salted rim. This step is optional, depending on your preference.
- Mix the Ingredients:
- In a portable container or a small shaker, combine 2 parts tequila, 1 part triple sec, 1 part lime juice, and 1 part simple syrup.
- Adjust the ratios to your taste preferences.
- Shake or Stir:
- If you have a portable cocktail shaker, give the mixture a good shake. If not, stirring with a spoon will work.
- Serve over Ice:
- Fill your camping cup or glass with ice.
- Pour and Garnish:
- Pour the margarita mixture over the ice.
- Garnish with a lime wedge.
- Enjoy Responsibly:
- Sip and enjoy your camping margarita responsibly.
Remember to check if alcohol is allowed at your camping site, and if so, be sure to follow any regulations regarding its consumption. Additionally, consider packing reusable and lightweight camping-friendly barware for an easier and more enjoyable experience.
At Kiefer Campgrounds, we ask you to have fun and be responsible while drinking alcohol on any of our campgrounds.

Dollar Store Camping Tips
Camping on a budget doesn’t mean you have to sacrifice comfort or convenience. Dollar stores can be a great resource for affordable camping supplies. Here are some dollar-store camping hacks to help you make the most of your outdoor adventure:
Hacks:
- Flashlights and Lanterns:
- Purchase inexpensive LED flashlights or lanterns to illuminate your campsite at night.
- Don’t forget to stock up on extra batteries, as they are often available at dollar stores.
- Disposable Tableware:
- Pick up disposable plates, cups, and utensils for easy cleanup.
- Look for sturdy, reusable plastic options that can be washed and reused for multiple meals.
- Ziploc Bags:
- Use Ziploc bags to organize and protect your belongings, such as electronics, matches, or snacks.
- They can also be handy for packing toiletries or keeping your phone safe from water and dirt.
- Tarp or Plastic Tablecloth:
- Grab a cheap tarp or plastic tablecloth to use as a ground cover under your tent or as a makeshift rain shelter.
- It’s an affordable way to protect your gear from damp ground or unexpected rain.
- Candles:
- Purchase candles for ambient lighting at the campsite.
- You can also use them to help keep bugs away.
- First Aid Supplies:
- Dollar stores often carry basic first aid supplies like bandages, antiseptic wipes, and pain relievers.
- Assemble a simple first aid kit with these affordable items.
- Plastic Bins:
- Use plastic bins or containers to organize and store your camping gear.
- They can also double as wash basins or food storage.
- Rain Ponchos:
- Pick up inexpensive rain ponchos to stay dry in case of unexpected rain.
- They are lightweight and easy to pack.
- Trash Bags:
- Grab a pack of large trash bags for collecting and disposing of your garbage responsibly.
- They can also be used as impromptu rain covers or ground covers.
- Bungee Cords and Clothespins:
- Secure tarps or create makeshift clotheslines with bungee cords.
- Clothespins can be handy for hanging wet clothes or securing items to a line.
- Microfiber Towels:
- Dollar stores often carry small microfiber towels that are compact and quick-drying.
- They’re perfect for camping and won’t take up much space in your backpack.
- Foam Sleeping Pad:
- Look for foam kneeling pads or yoga mats at the dollar store to use as a budget-friendly sleeping pad.
Remember to check the quality and durability of items before purchasing, and adapt these ideas based on your specific camping needs and preferences. Happy camping!
It’s never too early to book your summer camping trip! Book your site at any of our Kiefer Campgrounds today!
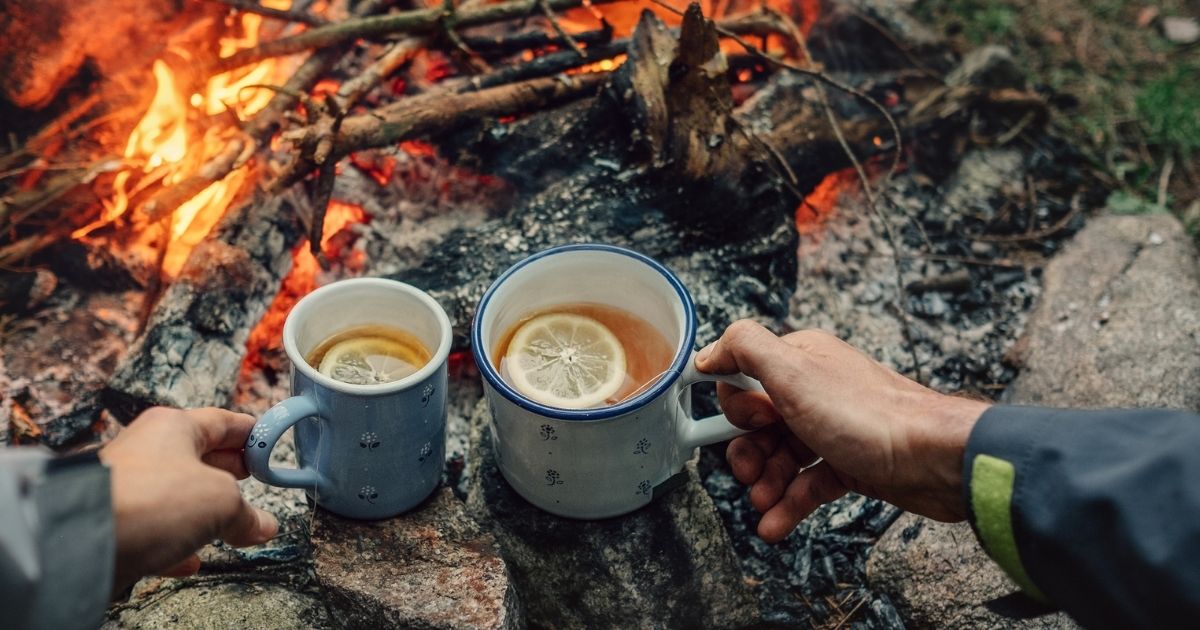
Campfire Hot Toddy
A Campfire Hot Toddy is a warm and comforting drink perfect for chilly evenings. It typically combines whiskey, honey, lemon, and warm water or tea, creating a soothing beverage with a touch of smokiness. Here’s a recipe for a Campfire Hot Toddy:
Ingredients:
- 2 oz whiskey (bourbon or another favorite)
- 1 tablespoon honey
- 1/2 oz fresh lemon juice
- 1 cup hot water or hot tea
- Optional: Cinnamon stick and lemon wedge for garnish
Instructions:
- In a heat-resistant glass or mug, add the whiskey and honey.
- Squeeze in the fresh lemon juice and drop the lemon wedge into the glass.
- Pour in the hot water or hot tea and stir well until the honey is fully dissolved.
- Optional: Garnish with a cinnamon stick for added flavor and aroma.
- Allow the drink to cool slightly before sipping. Be cautious as it will be hot.
The smoky or campfire twist in this Hot Toddy comes from the warmth and comfort it provides, rather than a specific smoky ingredient. The combination of whiskey, honey, and lemon, paired with the soothing hot water or tea, creates a delightful and relaxing drink. Adjust the honey and lemon to suit your taste preferences. Enjoy your Campfire Hot Toddy responsibly!
The perfect cozy drink to have around the campfire. Try this recipe out on your next trip to any of our Kiefer Campgrounds!

Family owned and operated, Kiefer Campgrounds strive to offer you the best rates for a comfortable location with outstanding service, and spotless facilities. When you stay in one of our parks, you are no longer just a happy camper, but a part of our family! We are most certain you will enjoy your stay with us. Pick your favorite location and book your spot now before it’s too late! You’ll be happy you did!